What are the properties in Notion?
While using a Notion formula, you can use prop() which helps to define any particular characteristic or dataset that will be used for further calculations or assessment.
prop() pulls the relevant data from another property in place inside the tool and helps us perform several functions as shown below.

Eg: Let’s say you want to populate the name from one column to another using a Formula. Here’s the formula you will use for the same.
prop(“Name”)
Using the above pulls in the desired information that is stored in the Name column as shown above and populates the same in the desired column with the use of the prop().
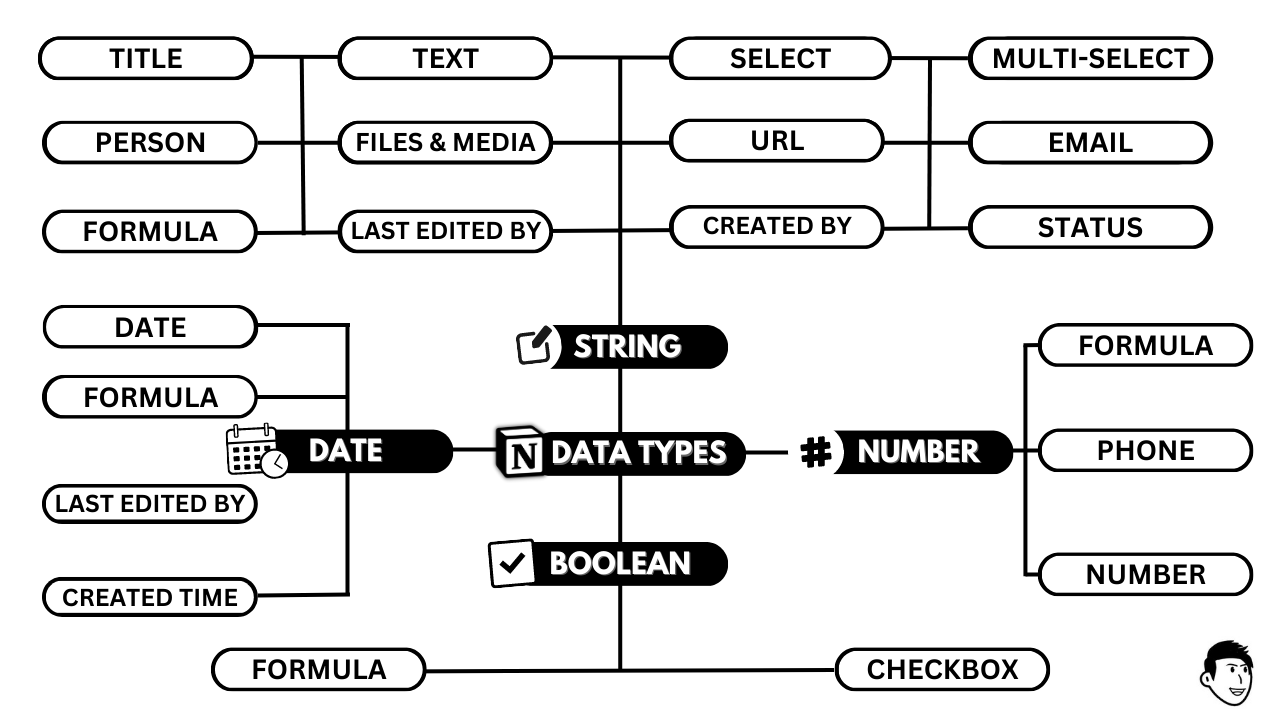
Data types in Notion
In Notion we can use 4 types of data types while providing the inputs inside prop(), i.e.:
- String – For string / text-based content.
- Number – For number-based input (applicable in any currency).
- Boolean – Used to validate true or false conditions concerning any condition.
- Date – Used to calculate date values within the tool.
Note: Sometimes Notion may state that a function used in the database would accept only one type of argument with the error message “accepts only numbers as an argument” (or any other form of data type). In this case, one can use prop () as an argument, as long as there is a similarity in the referenced property used in the database.
Eg: Let’s say there is a property called Concatenated which requires a concat property to join the values in the form of text within. Here we will use the formula concat(prop(“Text1”),prop(“Text2”)). This will concatenate both values together for results.
Properties in Notion
Here’s a complete table that will apply to all the properties used in Notion:
| Properties | Data Types | Notes |
|---|---|---|
| Title | String | Default “text-based” property that is created during the creation of a database |
| Text | String | Populates text-based information in the database |
| Number | Number | This is the number property that stores information related to any numerical values |
| Select | String | This stores one out of many options as a string-based value in the database |
| Multi-Select | String | This stores multiple options as string-based values in the database |
| Status | String | Gives the option to display status in the form of text, i.e. “Not Started”, “In Progress” or “Done” to give the status of something. |
| Date | Date | This is used to provide any date values in the database. One can use the start and end functions to access the dates within a range. |
| Person | String | Helps to store the name of a person in the database |
| Files and Media | String | Upload media files or embed links to store information |
| Checkbox | Boolean | Returns TRUE or FALSE based on the condition |
| URL | String | Gives the URL of the destination |
| String | Provides the email id of the person concerned | |
| Phone | String | Gives the phone number of the person as a string |
| Formula | String, Number, Boolean, Date | Used to calculate values based on the formula provided. Can return any of the data types such as String / Number / Boolean / Date |
| Relation | String | Used to build a relationship with another database for deriving values |
| Rollup | String, Number, Boolean, Date | Used to calculate the rolled-up values of the source database in another database |
| Created Time | Date | Returns the time when anything is created |
| Created By | String | Returns the name of the person who created any property |
| Last Edited Time | Date | Gives the time when anything was last edited by a person |
| Last Edited By | String | Provides the name of the person who had last edited the property |
Let’s discuss each of the properties in detail.
1. Title

The default property which is created while creating a database is the Title property. This has a string-based data type.

2. Text

Next up, we have a text property that can be used in several scenarios for different purposes as a string-based entry.
Simply click on the property and start typing to assign text-based values for the property.

3. Number

Next up, we have the Number property which is used in different scenarios where the Number is a part of the input.
Simply click on the property and type the number you desire to get the Number value in the database.

4. Select

This provides one of the 3 input values that is given in a database. In the database, there are 3 options to choose from when it comes to the Select property, i.e.:
- In Progress
- Not Started and
- Done
Simply click on the field and choose one of the options from the Select option as required.
Note: You can manually add or edit the options given by default in the Select property as well.

5. Multi-Select

This provides an option to add multiple values as opposed to the Select option we looked after in the previous example. In the database, there are 3 options to choose from when it comes to the Multi-Select property, i.e.:
- In Progress
- Not Started and
- Done
Simply click on the field and choose more than one of the options from the Multi-Select option as required.
Note: You can manually add or edit the options given by default in the Multi-Select property as well.

6. Status

Next up, we have the status assigned against any property described earlier. This helps to find one of the 3 statuses that we can think of, i.e.:
- Not Started
- In Progress
- Done
Simply click on the field and choose one of the 3 options from the Status option as required.
Note: You can manually add or edit the options given by default in the Status property as well.
7. Date

Next up, we have a date property that has a date value assigned against it. This returns the output in the form of a date.
Simply click and select a date as you desire to get the date value in the field provided.
Tip: This can be used along with start and end functions to find a range of dates assigned between 2 dates.

8. Person

This assigns the name of the person concerned to whom you can assign any specific task in the database.
Simply click and choose the name of the person from the available options to assign the task to a specific person concerned.

9. Files & Media

Next up, we have Files & Media where we can either choose an image or insert a URL to add the image to the database.
This allows us to either add a file by attaching the same or we can get the same by using a URL for the same.

10. Checkbox

Next up, we have a checkbox property that has either TRUE or FALSE values that can come as an output.
Simply click on the property and you can either get a TRUE or FALSE value for the same.

11. URL

Next up, we have a URL that stores the link to any specific page or a site that can be used to navigate to anything online.
This stores a string-based data type and helps us to navigate to the pages we assign.

12. Email

Then we have the next property, where we can assign the email values in the database.
This stores email as an input which again has a string-based value.

13. Phone

Next up, we have another property where we store the values as the phone number. Here we will have Number based property which comes as the output in the phone number.
In essence, this would be the phone number of any person who would be required (if any).

14. Formula

Next up, we have the Formula property which takes any input as a formula and calculates the output based on it.
We can take any input for any formula as desired.
Related: Notion Formulas: Beginner to Advanced (2023)

15. Relation

Next up, we have the Relation property which is used to set up the relationship between 2 different databases for further analysis.
As seen above, we have 2 databases namely Source and Destination.
From the Source database, we have linked to the Destination database and vice-versa. This is a very important property that helps to build connections between 2 different databases.
After setting up a relation we would require the use of Rollup to get the desired values we need from the Source database.

16. Rollup

Next up, we have Rollup which pulls in the desired values using Relation that builds a relationship between 2 databases i.e. Source and Destination.
While using a Rollup, we need to assign the property type and what we need to enter in the Calculate section to find the desired values we are looking for.
Note: Rollup can be used to pull in string, boolean, date or even numerical values based on the property we are trying the pull the information from.

17. Created Time

Next up, we have created time which shows the time when a property is created in a database.
The creation time is essentially the time when anything is created for the first time and is thus not linked to the current time by any means.
This has DATE format as expected and it gives the output in the form of MM/DD/YYYY along with the correct time as well.
18. Created By

Next up, we have another property which is “Created by”. This shows the person who created the property and shows the name of the person concerned.
This again is the name of the person who created the property, but not the one who edited it.

19. Last Edited Time

Next up, we have Last Edited Time which shows the time when a property was last edited by anyone.
So this reflects the date and the time when a property is edited for use.

20. Last Edited By

Next up, we have Last Edited By which shows the name of the person who had last edited the property.
This shows the information in a string-based format showing the name of the person concerned.
One can’t change or edit this property as the property automatically generates the information on its own.

Conclusion on properties in Notion
Here we have reached the end of this post where we have discussed about what are the properties in Notion.
One needs to note that properties can be interchangeably used as per the suitability of the user who is looking to use the tool as per their choice and use.
As you use the same with more efficiency, you would find opportunities to explore and create powerful templates or tools for your use.
Thus properties in notion provides the flexibility to use the nocode tool as desired.