
Hi, there 👋. Welcome to the accountantguy.
Today, we are going to learn how we can create this fantastic minimalistic Notion Bills Tracker to monitor and manage your expenses by keeping track of your bills, payments, and due dates with ease. It helps to avoid late fees, track your payments on time, and improve financial management.
Our tracker seamlessly integrates with your Notion account and allows you to easily categorize your expenses, calculate the due dates of bills on time, categorizes it based on priority and much more.
Here are some important things you need to know first before we dive deep into the process of creating this Notion Bills Tracker.
Benefits of Notion Bills Tracker
Here are 5 prominent benefits of using this minimalistic Notion Bills Tracker:
1. Keeps track of your expenses in one central location.💰
2. Encourage paying the bills on time to improve your financial situation.💲
3. Look out for your spending habits that can add up to extra bills without any requirement.✔
4. Pay your bills based on priority such as Low, Medium, and High to take care of bills in the right order.📃
5. Access your bill tracker from any device, anywhere💻
Where can I download this Notion Bills Tracker?
You can download this Notion Bills Tracker from here.
You can also visit theaccountantguy.gumroad.com to check out more templates.
Check it out NOW!!! 🔥
Related: How to build Notion Net Worth Tracker.
Features of using this Notion Bills Tracker
This minimalistic Notion Bills Tracker has the following 4 segments in the dashboard:
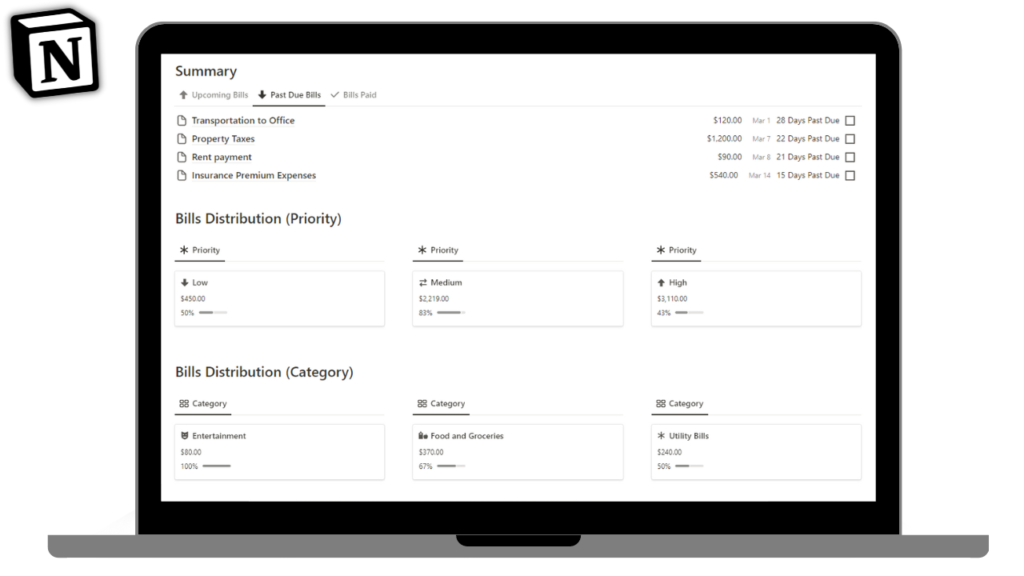
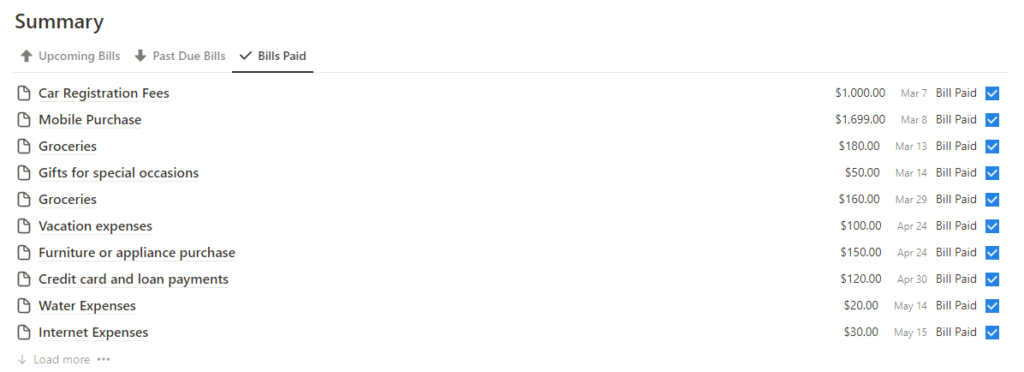
Summary
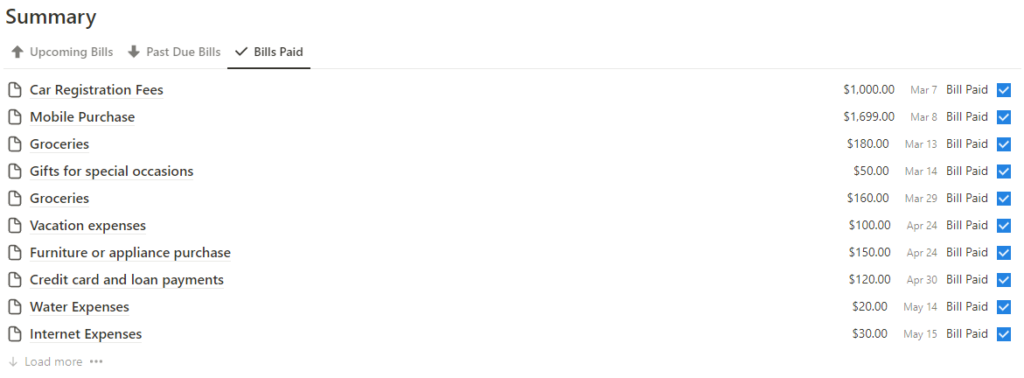
This shows an overall summary of all the bills that are either upcoming in the future, have gone past due, or have been paid in the past.
Here are the things noticeable for the Notion Bills Tracker in the summary segment:
- Description of the bill – This shows the description of the bills that are being talked about.
- Amount of the bill – This shows the amount of the bill that is being talked about.
- Due date of the bill – This shows the due date by when the bill must be paid.
- Status of the bill – This shows the status as the days for the bills to be paid (if not paid) or “Bill Paid” for the bills that have been paid.
- Checkbox – If checked, it would reflect that the bills have been paid by the user or vice-versa.
Note: The above information is pulled from another database, i.e. Bills Details database (to be discussed further)
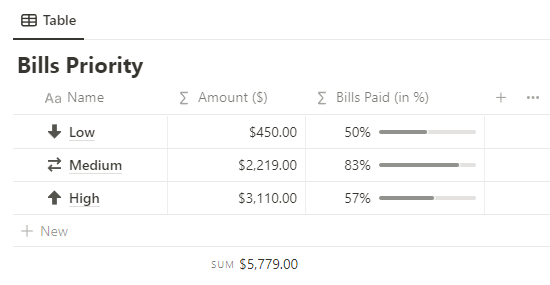
Bills Distribution (Based on Priority)

This section shows an overview of the division of all the bills based on the priority of paying the bills:
- Low Priority – Shows the bills that have a low priority of payment during the period.
- Medium Priority – This shows the bills that have a medium priority of payment during the period.
- High Priority – This shows the bills that have a high priority of payment during the period.
- Amount – This shows the expenses made under each priority of bills that are paid.
- Bills Paid (in %) – This shows the percentage of bills that are paid as compared to the total bills under each priority.
Note: This information is pulled from another database, i.e. Bills Priority database (to be discussed further)
Bills Distribution (Based on Category)
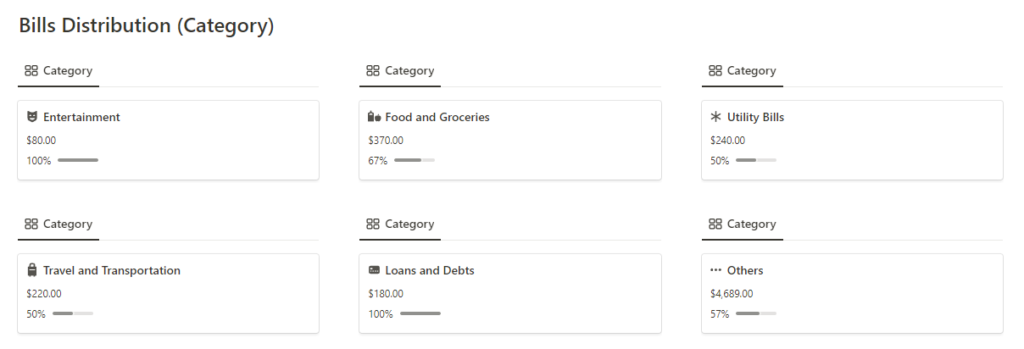
This section indicates the different expenses that are made by a person divided into 6 categories of expenses such as:
- Entertainment
- Food and Groceries
- Utility Bills
- Travel and Transportation
- Loans and Debts
- Others
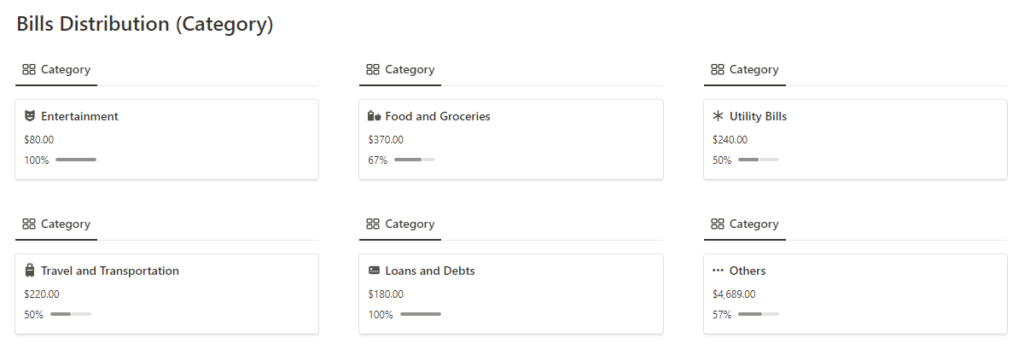
For each category of expenses, it reflects 2 things, i.e. the amount of expenses and the percentage of bills paid to the total bills.
As an example from above,
| Expenses | Amount (in $) | Bills Paid (in %) |
| Entertainment | $80.00 | 100% |
| Food and Groceries | $370.00 | 67% |
| Utility Bills | $240.00 | 50% |
| Travel and Transportation | $220.00 | 50% |
| Loans and Debts | $180.00 | 100% |
| Others | $4,689.00 | 57% |
| Total | $5,779.00 | – |
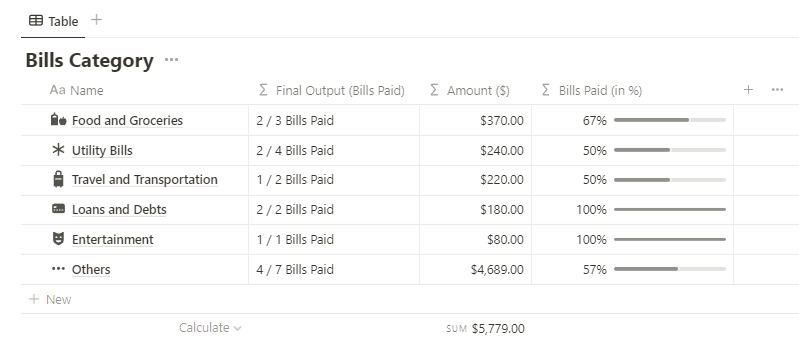
Note: This information is pulled from another database, i.e. Bills Category database (will discuss later)
Here’s a screenshot of the above database.
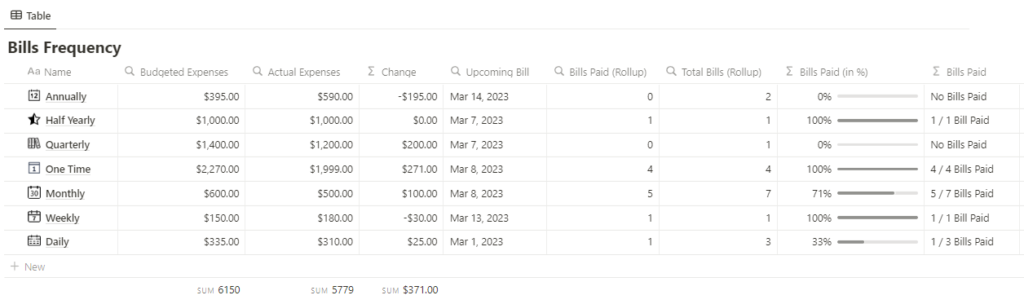
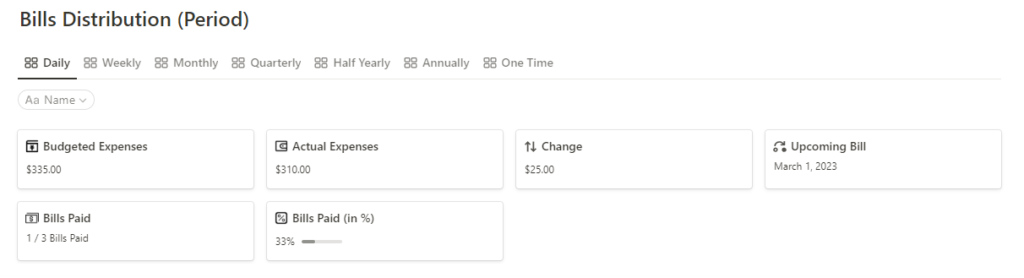
Bills Distribution (Based on Period)
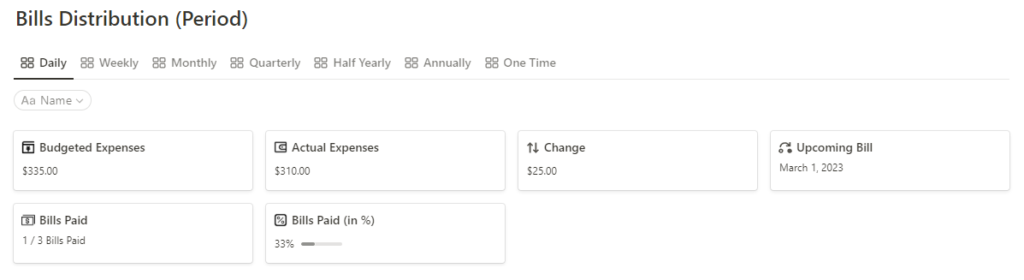
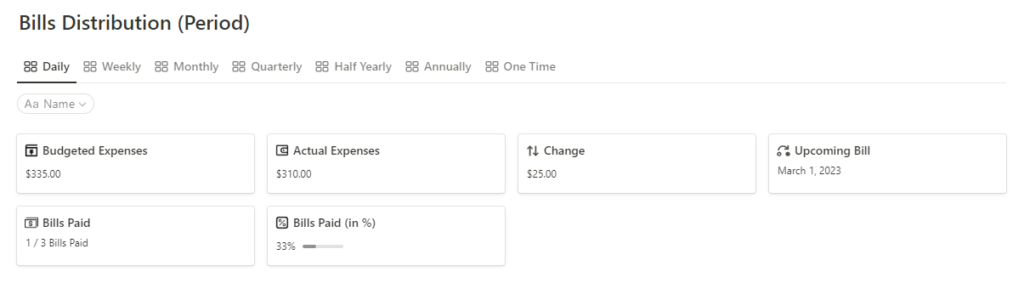
This section gives an overall summary of expenses made under different periods such as:
- Daily
- Weekly
- Monthly
- Quarterly
- Half Yearly
- Annually
- One Time
For each period of expense, we have summarized the entire tracker as follows:
- Budgeted Expenses
- Actual Expenses
- Change
- Upcoming Bill
- Bills Paid
- Bills Paid (in %)
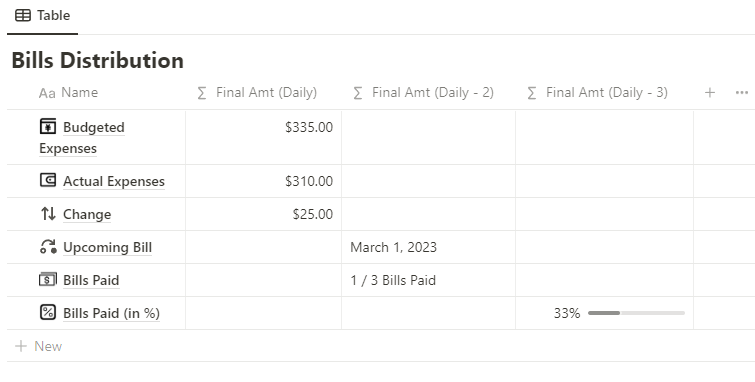
Note: This information is pulled from another database, i.e. Bills Distribution (will discuss later)
Here’s a screenshot of the above database.
How to create a minimalistic Notion Bills Tracker?
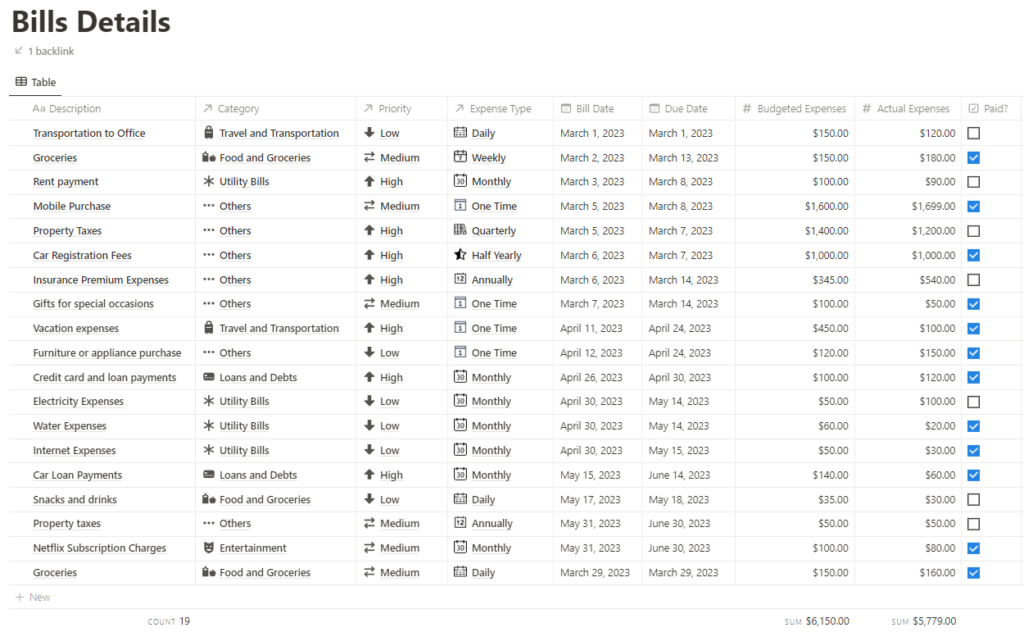
We need to fill in the details of the bill onto the Bills Details database to help us create a minimalistic Notion Bills Tracker.
For this, first, we need to create a page to store the database related to the bills and will name it as Bills Details database as shown below.
We will create all secondary databases to support the Bills Details database as discussed further.

Alongside this, we need to create the following secondary databases to help us create this minimalistic Notion Bills Tracker:
| Database | Purpose |
| Bills Frequency | Holds the information related to payment of the bills as per the different frequencies of payment such as Annually, Monthly, Daily, Quarterly etc |
| Bills Category | Holds the information related to different categories of payment of the bills such as Food and Groceries, Utility Bills, Travel and Transportation, Loans and Debts, Entertainment and Others |
| Bills Priority | Holds the information related to different categories of payment of the bills based on the priority of payment, i.e. Low priority, medium priority, and high priority. |
| Bills Distribution | Holds the information related to different categories of payment of the bills with information related to Budgeted Expenses, Actual Expenses, Change, Upcoming Bill, Bills Paid, and Bills Paid (in %). |
We will discuss how to create each database one by one.
Building the Bills Details Database
To create a new database, simply type “/database” and then select “Database-Inline” to create a database for storing the details of the bill.
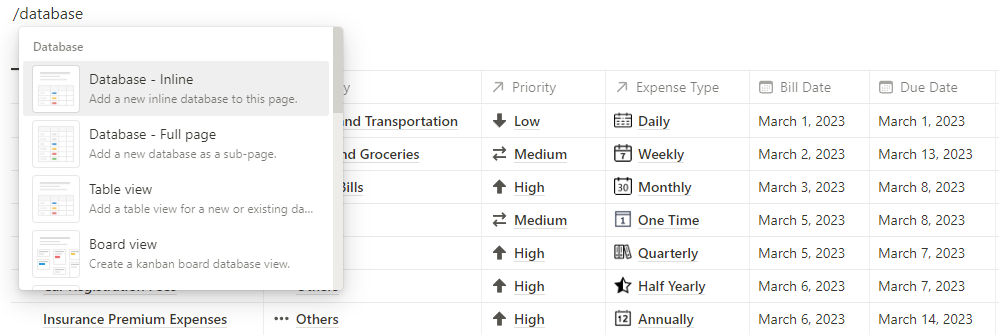
Important Note: Repeat the above process for creating other databases as mentioned above such as Bills Frequency, Bills Category, Bills Priority and Bills Distribution.
The above Bills Details database will help to hold the details related to all the bills and its whereabouts to help us create this bills tracker.
In this database, we will get all the details related to bills such as Due Date, Bill Date, Expense amount and much more.
Why do we need to create the Bills Details database?
This database will help build the necessary structure for other databases such as the Bills Frequency, Bills Category, Bills Priority and Bills Distribution.
Moreover, this database will be used to summarize the information in the primary dashboard.
In nutshell, this is the brain of the entire template we are about to build.
How to add properties to the Bills Details database in Notion Bills Tracker?
Let’s get to know the properties of this Bills Details database one by one.
| Property | Type | Use |
| Description | Title | Store details related to the expenses (bills) |
| Category | Relation | Stores information related to the category of bills |
| Priority | Relation | Stores information related to the bills based on priority |
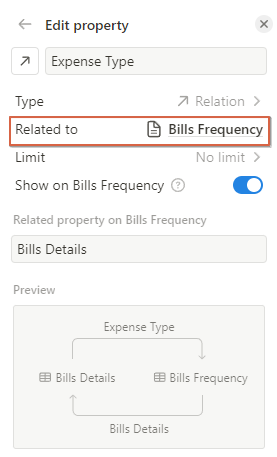
| Expense Type | Relation | Stores information related to the bills based on the type of expense |
| Bill Date | Date | Stores the date of the bill related to an expense |
| Due Date | Date | Stores the date during which an expense is due to be paid |
| Budgeted Expense | Amount | Shows the budget made for an expense to be paid related to a bill |
| Actual Expense | Amount | Shows the actual amount of expense made concerning a bill |
| Paid? | Checkbox | Reflects if a bill is paid as reflected from the status of bill |
1. Description
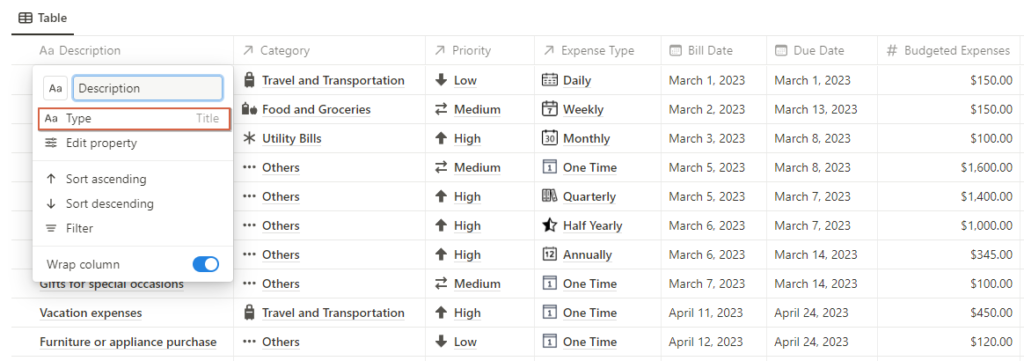
This indicates the description of the expense made while paying a bill. Common bills such as Electricity Bills, Vacation Expenses, Travel expenses etc can be shown here.
This has the default Title property which is created when you create the database for the first time.
2. Category
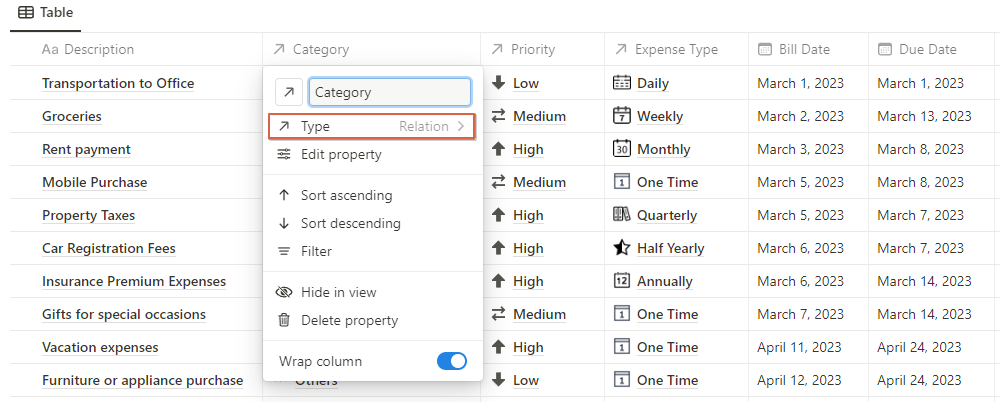
Next up, we have the Category of Bills which has a Relation property that helps to show the type of expenses made, such as Food and Groceries, Travel and Transporation, Utilities etc.
This has a Relation property which helps us to relate the expenses (bills) to different categories of expense for better analysis.

3. Priority
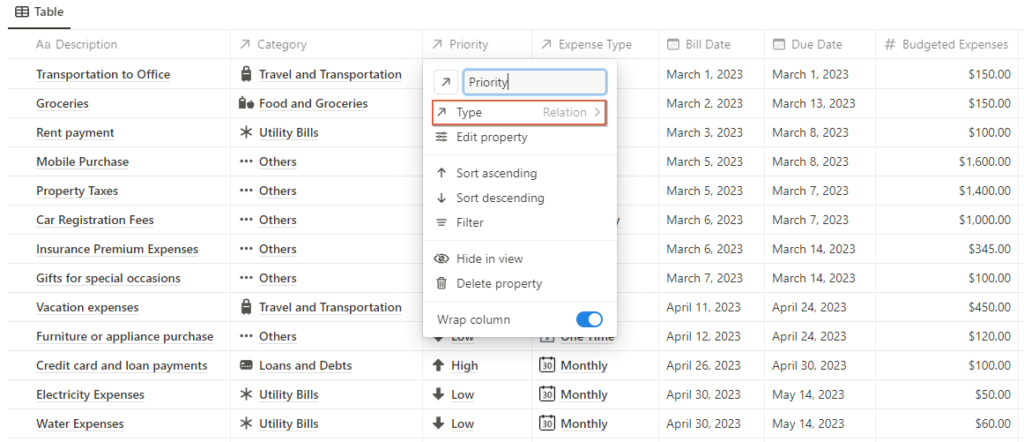
Next up, we have the Priority of Bills which has a Relation property that helps to show the priority of expenses made, such as Low, Medium, and High Priority of expenses.
This has a Relation property which helps us to relate the expenses (bills) to different priorities of expense for better analysis.

4. Expense Type
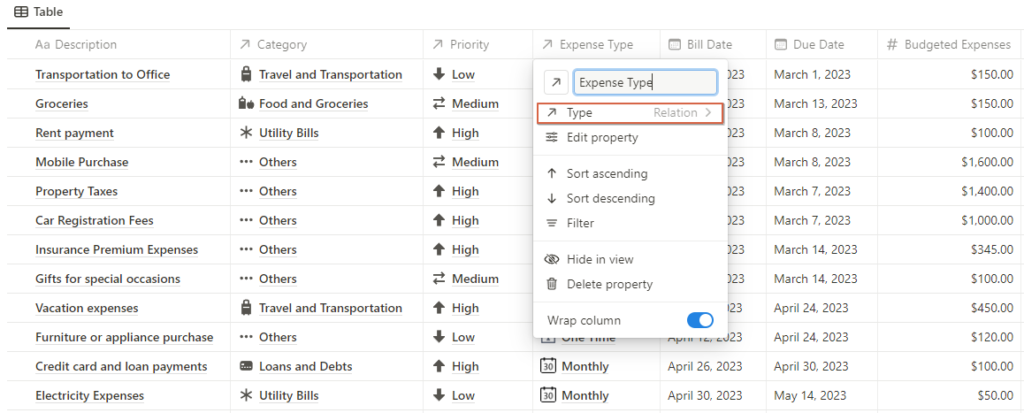
Next up, we have the Expense Type which has a Relation property that helps to show the periodicity of expenses made, such as Daily, Weekly, Monthly, Annually etc.
This has a Relation property which helps us to relate the expenses (bills) to different periods of expense for better analysis.
5. Bill Date / Due Date
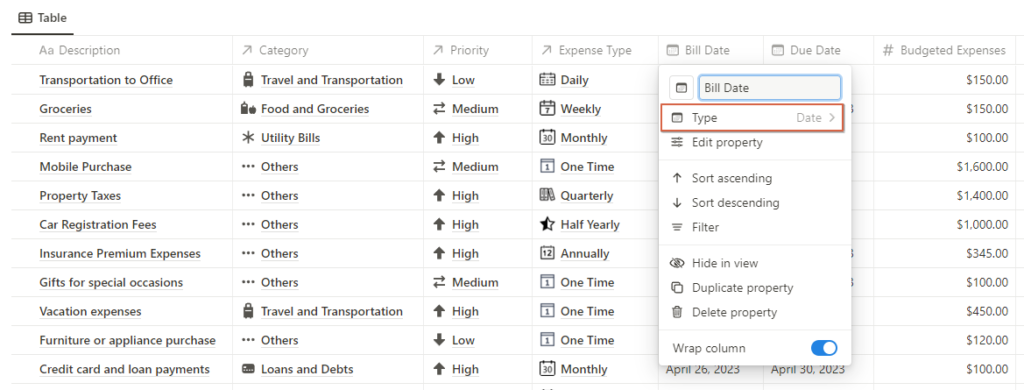
Bill Date has a date property that reflects the date when an expense is made.
Due Date also has a date property which reflects when a bill is due to be paid by the person.
6. Budgeted Expenses / Actual Expenses
Next up, we have budgeted expenses / actual expenses which both have a Number property assigned to it.
Budgeted Expenses reflect the budgeted amount of expense that we wish to incur regarding the bill.
Actual Expenses reflect the actual amount of expense that we have incurred against the bill.
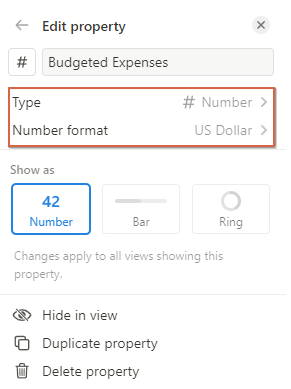
Note: We can select the currency of our choice, here we have selected US Dollars for the sake of simplicity.
7. Paid?
Finally, we have the checkbox representing if the bill is paid or not.
Clicking on the checkbox updates the status of the bill as paid and vice-versa.
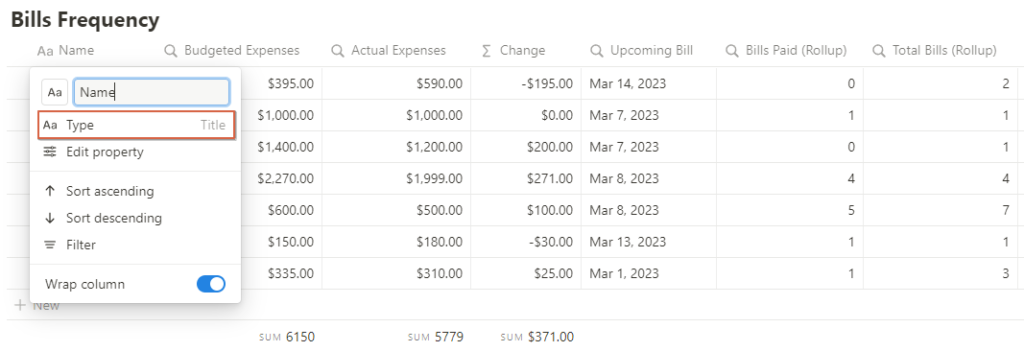
Building Bills Frequency Database
Now, let’s create a new database and name it “Bills Frequency Database”.
Here’s a quick overview of all the properties to be used in the Bills Frequency database in the Notion Bills Tracker:
| Properties | Property Type | Purpose |
| Name | Title | Specifies the frequency of expenses made during the year. |
| Budgeted Expenses | Rollup | Rolls up the amount of the budgeted expenses from the Bills Details database. |
| Actual Expenses | Rollup | Rolls up the amount of the actual expenses from the Bills Details database. |
| Change | Formula | Calculates the change in the budgeted and actual expenses rolled up from the Bills details database |
| Upcoming Bill | Rollup | Rolls up the upcoming bill (earliest bill) from the Bills Details database. |
| Bills Paid (Rollup) | Rollup | Rolls up the total number of bills paid from the Bills Details Database. |
| Total Bills (Rollup) | Rollup | Rolls up the information related to the total bills from the Bills Details Database. |
| Bills Paid (in %) | Formula | Calculates the bills paid as compared to the total bills (in %). |
Why do we need to create the Bills Frequency database?
Creating this database will help to give the base to create the Bills Distribution (Period) in the primary dashboard of the Notion Bills Tracker as shown below.
Now, let’s learn how to create and add each of the properties to the Database.
How to add properties to the Bills Frequency Database?
We will add the following properties to the Bills Frequency Database as discussed below:
- Name
This is the first property that is created while creating a database.
This has a Title property which is used to record the frequency of expenses while creating the Bills Details database.
The types of frequency of expenses include Annual, Half Yearly, Quarterly, One Time, Monthly, Weekly, and Daily expenses.
- Budgeted Expenses / Actual Expenses
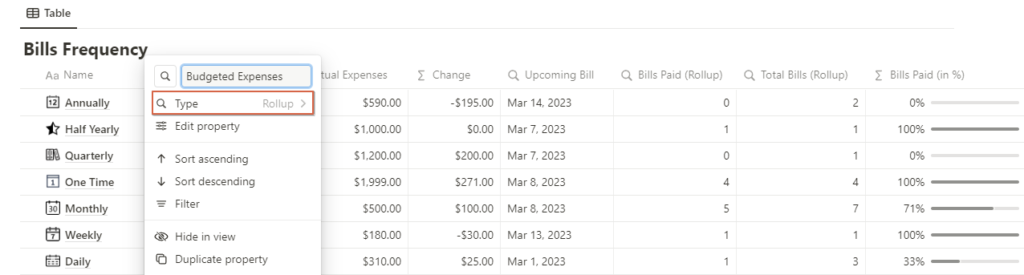
This reflects the amount of the budgeted expenses concerning each period of expense as shown above.
This is rolled over from the Bills Details Database.
Note: This is the same for Actual Expenses as well, except we will roll over actual expenses in that case.
- Change
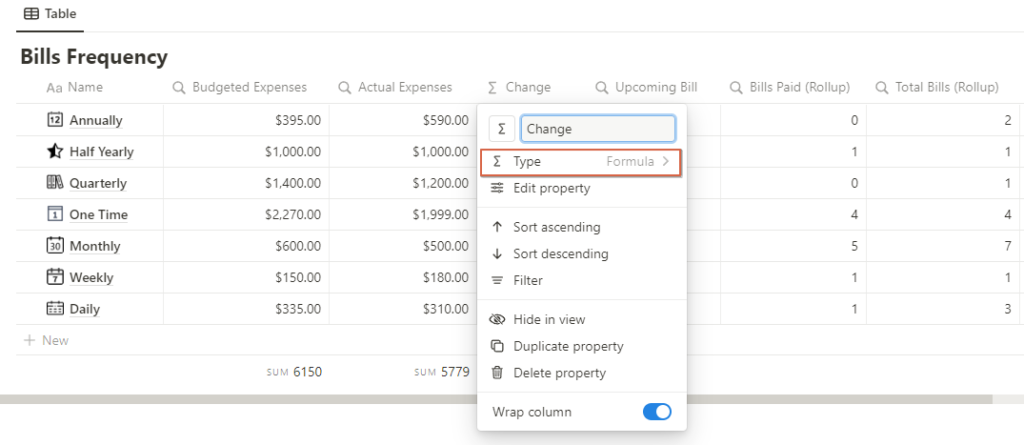
This reflects the change in the Actual Expenses as compared to the Budgeted Expenses.
Note: Thus a change reflected in positive means spending within the budget and a change reflected in negative means overspending beyond the budget.
This is derived as a Formula related to the Bills Details Database as discussed below.
prop(“Budgeted Expenses”) – prop(“Actual Expenses”)
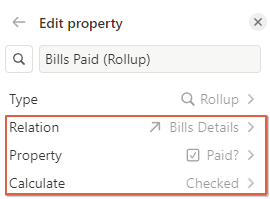
- Upcoming Bills / Bills Paid (Rollup) / Total Bills (Rollup)
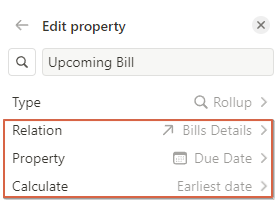
Here we are rolling over 3 information from the Bills Details Database:
- Upcoming Bills – Rolls over the earliest due date of the bills from the Bills Details Database.
- Bills Paid (Rollup) – Rolls over the Bills Paid from the Bills Details database with the status of payment as checked.
- Total Bills (Rollup) – Rolls over the Total Bills from the Bills Details database with the description of the bills and putting them under count all.
5. Bills Paid (in %)
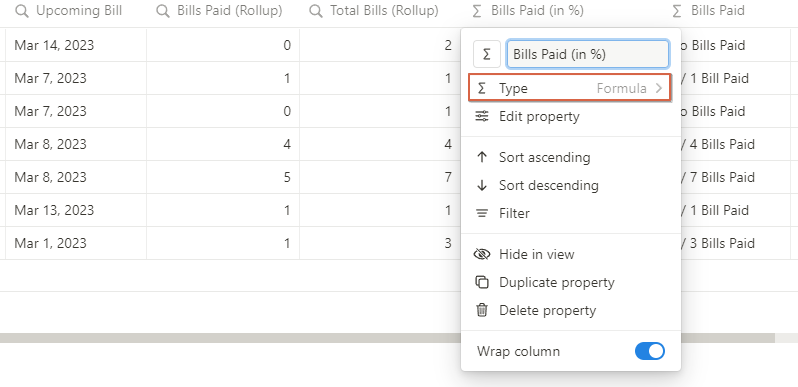
This helps to calculate the Bills that have been paid concerning the total bills in hand (in %).
This is using a Formula property to calculate the same, i.e.:
round(prop(“Bills Paid (Rollup)”) / prop(“Total Bills (Rollup)”) * 100) / 100
6. Bills Paid
Then we have Bills Paid which is again a Formula that reflects the total bills paid as against the number of bills in text.
We have used a formula to carry out the above process as follows:
if(prop(“Bills Paid (Rollup)”) == 0, “No Bills Paid”, if(prop(“Total Bills (Rollup)”) > 1, format(prop(“Bills Paid (Rollup)”)) + ” / ” + format(prop(“Total Bills (Rollup)”)) + ” Bills Paid”, format(prop(“Bills Paid (Rollup)”)) + ” / ” + format(prop(“Total Bills (Rollup)”)) + ” Bill Paid”))
Essentially, with the above formula we are calculating the bills paid vs total bills and reflecting the same in a formula as shown above.
Let’s now build the Bills Category Database.
Building Bills Category Database
This database will help to create an overview of the bills as per different categories of expenses made which includes the following:
- Food and Groceries
- Utility Bills
- Travel and Transportation
- Loans and Debts
- Entertainment
- Others
Now let’s look at why we need to build the Bills Category Database.
Why do we need to create the Bills Category Database
The Bills Category Database will help us to calculate the following concerning each category of expense, i.e.:
- Actual Expenses
- Bills paid wrt to the total outstanding bills (in %)
How to add properties to the Bills Category Database
This database is similar to the previous database that we discussed earlier.
Here’s a side-by-side comparison of the properties and their related uses:
| Bills Category Property | Similar to Bills Frequency Database |
| Name | Name (Sl No – 1) |
| Final Output (Bills Paid) | Bills Paid (Sl No – 6) |
| Amount ($) | Actual Expenses (Sl No – 2) |
| Bills Paid (in %) | Bills Paid (in %) (Sl No – 5) |
Note: We can use the above properties as discussed in Bills Frequency Database and create similar properties about the Bills Category database as shown above.
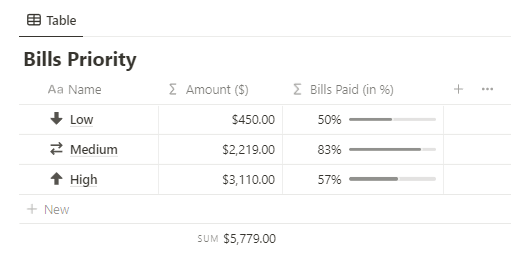
Building Bills Priority Database
Next up, we are building the Bills Priority Database wherein we are finding the following details while calculating the Bills to be paid:
- Name
- Amount.
- Bills Paid (in %).
Why do we need to build Bills Priority Database

We are building this database to build the Bills Distribution (Priority) on the Notion Bills Tracker dashboard page.
Note: This helps us to segregate the bills based on 3 different priorities as Low, Medium, or High priority of expense.
How to add properties to the Bills Priority Database
Let’s get to know the properties one by one.
This database is similar to the previous database that we discussed earlier.
Here’s a side-by-side comparison of the properties and their related uses:
| Bills Priority Properties | Similar to Bills Frequency Database |
| Name | Name (Sl No – 1) |
| Amount ($) | Actual Expenses (Sl No – 2) |
| Bills Paid (in %) | Bills Paid (in %) (Sl No – 5) |
Building the Bills Distribution database of Notion Bills Tracker
This is the last database we need to build to complete the Notion Bills Tracker.
This database is useful to segregate all the bills based on 6 parameters as shown above
- Budgeted Expenses.
- Actual Expenses.
- Change.
- Upcoming Bill.
- Bills Paid.
- Bills Paid (in %).
Why do we need to build the Bills Distribution Database for the Notion Bills Tracker
To create the Bills Distribution (based on period) we need to build the Bills Distribution Database.
How to add properties to the Bills Distribution Database
We will add the following properties to the Bills Distribution Database as discussed below:
- Name
This has the default Title property that helps to segregate the details of the expenses based on the following:
- Budgeted Expenses
- Actual Expenses
- Change
- Upcoming Bills
- Bills Paid
- Bills Paid (in %)
Then we have 3 properties to represent the above-stated information related to the expense which is incurred Daily.
All the properties have a Formula associated to it.
2. Final Amt (Daily) / Final Amt (Daily – 2) / Final Amt (Daily – 3)
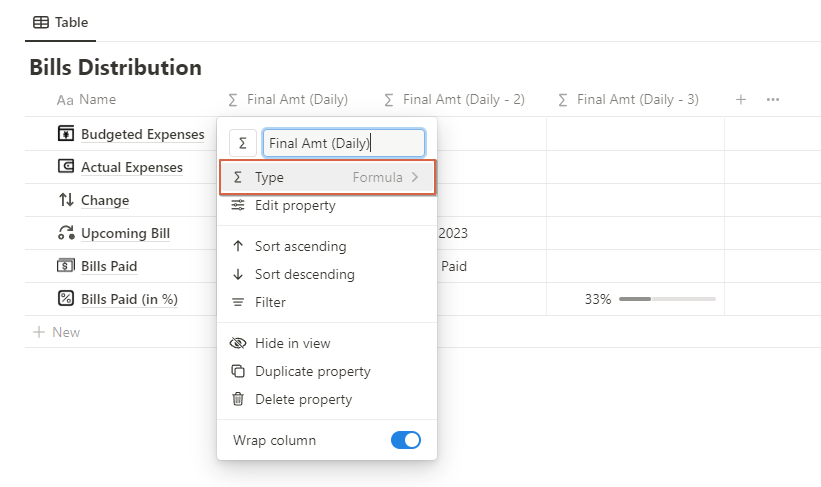
- Final Amt (Daily) – We have used the following formula:
if(prop(“Name”) == “Budgeted Expenses”, prop(“Budgeted Expenses (Daily)”), if(prop(“Name”) == “Actual Expenses”, prop(“Actual Expenses (Daily)”), if(prop(“Name”) == “Change”, prop(“Change (Daily)”), toNumber(“”))))
The above formula finds budgeted expenses, actual expenses and the change from the rolled up values in the database and fills it up based on matching the same text with the Name property in the database.
- Final Amt (Daily – 2) – We have used the following formula:
if(prop(“Name”) == “Upcoming Bill”, prop(“Upcoming Bill (Daily)”), if(prop(“Name”) == “Bills Paid”, prop(“Bills Paid (Daily)”), “”))
The above formula finds Upcoming Bills, and Bills Paid from the rolled up values in the database and fills it up based on matching the same text with the Name property in the database.
- Final Amt (Daily – 3) – We have used the following formula:
if(prop(“Name”) == “Bills Paid (in %)”, prop(“Bills Paid (in % Daily)”), toNumber(“”))
The above formula finds Bills Paid (in %) from the rolled up values in the database and fills it up based on matching the same text with the Name property in the database.
Note: We need to repeat the above process with other frequencies of bills such as Monthly, Weekly, Quarterly, etc, and complete this database.
Building the Primary Dashboard of Notion Bills Tracker
The primary dashboard of Notion Bills Tracker consists of 4 sections, i.e.
- Summary
- Bills Distribution (Priority)
- Bills Distribution (Category)
- Bills Distribution (Period)
Here’s how we are going to build each part one by one.
- Summary
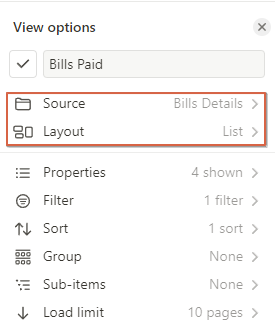
In order to create a summary of a database, we need to link it to the Bills Details database in the setting it onto a List mode of presentation.
After this, we need to enable the desired properties and hide the remainder to get the view we require.
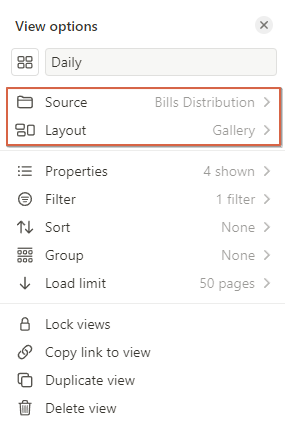
- Bills Distribution (Priority)

Next up, we need to set up the Bills Distribution (Priority) section in the primary dashboard.
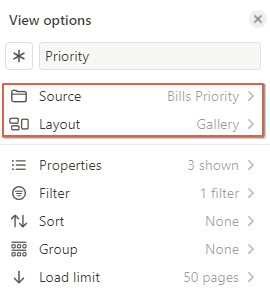
For this, we need to link this to the Bills Priority database setting it in Gallery mode of presentation.
Further, we need to enable the desired properties to get the right presentation as required.
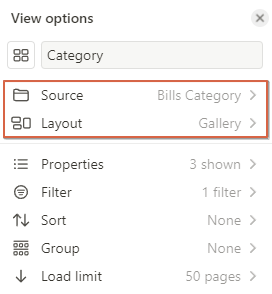
- Bills Distribution (Category)
Then we have Bills Distribution (Category) which is again linked to the Bills Category database that gives us the following:
- Actual Expense Amount (in $) for each category.
- Proportion of the bills paid to the total bills (in %).
- Bills Distribution (Period)
Then we have Bills Distribution (Period) which is again linked to the Bills Distribution database that gives us the following:
- Actual Expense Amount (in $) for each periodicity.
- Proportion of the bills paid to the total bills (in %).
Now we are done building the primary dashboard of the Notion Bills Tracker.
Conclusion
This brings us to the end of the preparation of this minimalistic Notion Bills Tracker.
In order to create the Notion Bills Tracker, all we need is a database to hold all the details of the bills and secondary databases to supplement further analysis.